

Mykola Logoyda, Lviv Polytechnic National University, Lviv, Ukraine
Abstract. The paper presents a concept of a process of personalized font design using the FontLab Studio software environment. The font is based on one’s own handwriting.
Keywords: font, handwritten font, personalized font, FontLab Studio
Introduction
The relevance of fonts as an object of research is determined by the variety of industries in which the fonts are used. The communicative function of fonts is no doubt important, and the study [1] is devoted to the analysis of the complexity of the font. The [2] researchers claim that there are over 750,000 digital fonts, prompting them to analyze possible relationships between font and reading speed. The [3] authors moved away from font recommendations and focused on investigating the properties of certain font elements. The authors [4] used a mathematical apparatus to design fonts, while [5] designed the font considering the needs of older adults.
Today, font development technologies have reached a fairly high professional level. It is interesting to be able to create fonts of various typefaces, including handwritten fonts based on a person’s own handwriting. Reproduction of the author’s handwriting in electronic format emphasizes the individuality of his publication and can be a guarantee of the success of a design project. Inspired by calligraphic writing, researchers developed the Calligraphy Z system, which consists of software and hardware for creating handwriting-like characters [6], fig. 1.

Fig. 1. A text output with a writing device [6]
The group of handwritten fonts (scripts) includes fonts with patterns similar to the handwriting and calligraphic style of writing symbols (Fig. 2). Fonts that imitate the handwritten style of writing symbols are surprisingly diverse and are often used to give the publication an informal character or emphasize its individuality. Usually, handwritten fonts are used in greeting and advertising cards, various invitations, high-art publications, the design of pages on social networks, etc.
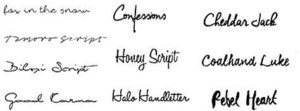
Fig. 2. Handwritten font example
Algorithms for the automatic segmentation of font glyphs into strokes have also been developed [7]. The segmented font (Fig. 3) becomes the basis for a wide range of stylizations.
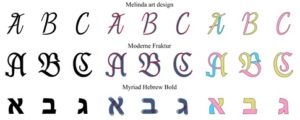
Fig. 3. Font segmentation concept for further variations [7]
The concept of a handwritten font design
In general, when designing new typefaces, especially handwritten ones, the following steps should be followed (Fig. 4):
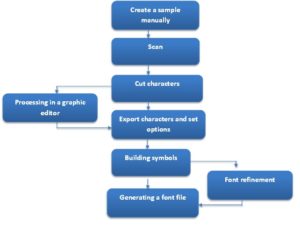
Fig. 4. Steps of handwritten font design
Creating a sample. At this stage, capital and lowercase letters, numbers, and special characters that will be included in the future font should be written on paper.
Scan a pre-written font sample. A handwritten sample of font characters is scanned, and the resulting image is converted to a black-and-white *bmp image.
Cutting symbols. Can be performed with Paint editor, or any other.
Symbol image processing in graphic editors. The stage is optional, but it allows each symbol to look better. In general, retouching of the outline of the symbol and tracing of symbols (if necessary) is performed.
Export symbols and set font parameters. Cut and processed symbols are exported to a font editor for further processing.
Each symbol designing with the font editor tools. Setting the font parameters.
Refinement of the font to the desired appearance. This step is not mandatory, but it allows for getting a high-quality and complete font. The stage includes setting parameters of kerning and tracking, as well as the formation of kerning pairs, hinting, and use of OpenType functions.
Font file generation. The font should be generated into a font file.
The application of the concept of handwritten font design
Fonts can be created in any vector editor and then exported to the corresponding file. However, another way is to create a font based on character drawings, saving each character in *eps or *tif format, for further processing in the FontLab font editor.
Creating a sample
For high-quality writing of font symbols, it is recommended to use an ink pen. All the characters of the alphabet, including numbers and punctuation marks, are written on a piece of paper, as shown in Fig. 5.

Fig.5. Original font sample
Scanning of pre-written font
The original sample of the font characters was scanned with an extension of 300 dpi, and a monochrome image with the extension bmp was obtained. This format was used to remove noise and other inaccuracies from the original. The resulting file will be used for further work on creating the font.
Cutting symbols
At this stage, it is necessary to cut out each symbol and save it in a separate bmp format file. As a result of cutting symbols, a set of images of each individual font symbol is obtained (Fig. 6).
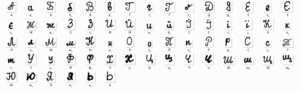
Fig.6. Set of images of each individual font symbol
Processing the image of symbols in a graphic editor
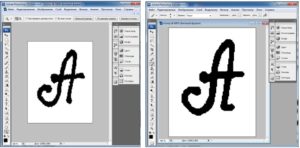
At this stage, the images of symbols obtained after cutting should be edited one by one using, for example, the Adobe Photoshop graphics editor. The main goal of this stage is to improve the visual appearance of the symbols. In the graphic editor, retouch and edit the symbols to the proper appearance (Fig. 7), and save them in tif format.
а) b)
Fig.7. Processing in Adobe Photoshop. a)– input image; b) – output image
Export symbols and set font parameters
Cut and processed symbols must be exported to separate glyph windows of the FontLab font editor for further processing.
Let us illustrate the letter A designing. We open a new glyph window to create the A letter. First, the markup of the symbol should be created in the open window. To carefully create markup, you can use both global (for all characters of the font) and local (for one character) guides. The guide lines differ in color, blue lines are local, and red lines are global. Local ones can be simply pulled from the lineup.
First, we use global lines only. Since the width of the symbols will be different, it is advisory leaving these guides as standard. The horizontal lines will be changed in accordance with the features of the created font, so the height of uppercase letters will be 800 C units, lowercase letters are 500, the height of numbers is 550 X units, the lower outliers will be placed within coordinates from 0 to -300 D units. The numerical values were chosen arbitrarily but applied to all font glyphs.
After performing all preliminary settings, the image of symbols can be imported into the glyph window of the font editor using the commands File®Import®Background (selecting the required image in tif format) (Fig. 8).
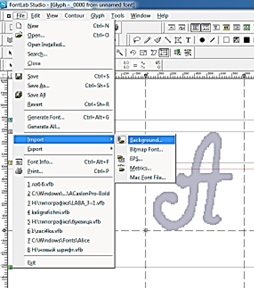
Fig. 8. Import process
After executing this command, the selected image will be imported into FontLab, where the silhouette of the symbol will be displayed in gray. This image must be scaled in accordance with the guide lines and the previously set parameters. To scale the silhouette, double-click on its image with the right mouse button, and while holding down the Shift button, move the boundaries of the contour. Such actions should be performed with each future letter, number, and character of the designed font.
Construction of symbols
To trace the symbol, use Tools→Background→Trace. To construct and edit the contour of the future font, use the tools of the Paint, Tools, and Contour panels.
The created contour should be optimized with the Contour→Optimize command. As a result of drawing curves, removing unnecessary nodes, and optimizing the contour, we get the handwritten symbol A, an example of which is shown in fig. 9.
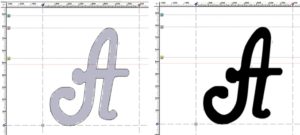
Fig. 9. Handwritten letter symbol “A”
The next step is to specify the name of the glyph and generate its Unicode. To change the name of a glyph, execute the command Contour→Rename glyph, after which a dialog box will open (Fig. 10), where we specify the name and Unicode of the glyph. To generate Unicode, execute the command Contour→Glyph Names→Generate Unicode. However, a simpler option for obtaining the Unicode glyph is to copy it from the appropriate template of the glyph symbol (Fig. 11).
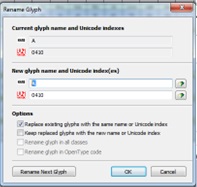
Fig. 10. Change name diagram and young glyph code dialog
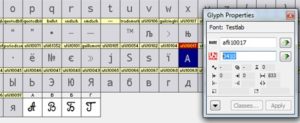
Fig. 11. Copying the unicode of the letter “A”
By analogy with the letter A, all the performed operations should be repeated for all characters of the font.
Input font information
An important stage that will directly affect the result of font generation is entering relevant information about it. To specify information about the font, select the command File→FontInfo. All settings for font information are divided into six main sections, which are displayed on the left side of the dialog box.
The first sections of the Font Info dialog box are Names and Copyright, which displays information about the font. In the right part of this window, the font developer sets all the necessary information. For example, Family Name should contain the name of the typeface to which this font belongs; Weight is a font saturation, and user can choose one of the nineteen proposed saturation options, and set the appropriate numerical value, or leave this field blank; font Width can be set manually or chosen among available options.
Editing font character metrics
Setting and editing glyph metric parameters are done in the Metrics window. To open this window, select a glyph and choose Window tab, and New metrics window. Selected glyphs will appear in the Metrics window.
Kerning is an important metric, as it changes the distance between characters of certain combinations (kerning pairs), for example, Fig. 12. Kerning can be both positive (when the distance between the characters increases) and negative (when the characters are shifted towards each other). Kerning pairs are specified by specifying exact numerical values in the corresponding input fields.
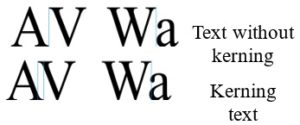
Fig. 12. Text and kerning
Configuring the parameters of the metric
Let us set the character metrics, i.e., fields and character width, kerning, and tracking. The sizes of the character fields are set in the editing window (Fig. 13) by moving the borders.
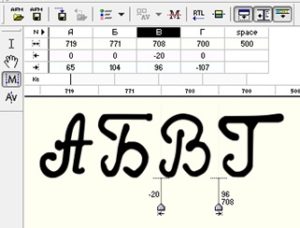
Fig. 13. Font Metrics Definition dialog box
The width of the symbol and the size of the right and left fields are changed on the corresponding panel, while the optical parameters of the symbol (the relative area of the black area, as well as the optical fields of the symbols) are automatically calculated.
To create kerning pairs, we define pairs of symbols for which kerning is necessary and fill in the symbols in the corresponding window, and manually drag the symbols to the required distance (Fig. 14).
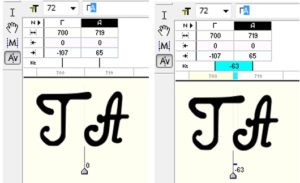
а) b)
Fig.14. An example of the formation of a kerning pair a) – before, and after b) – kerning
Hinting
Font hinting is performed so that each character of the font was equally legible at both high and low magnification. In FontLab Studio, it is possible to perform hinting both manually and automatically (Fig. 15).
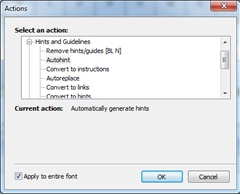
Fig. 15. Automatic Hinting
To check the correctness of the construction of the contours use View→Show Layers. To guarantee the mathematical quality of contours created with FontLab, a FontAudit is used. FontAudit tests the contour of the symbol for its compliance with more than 20 requirements and displays the errors found in the corresponding panel. FontAudit has another useful property, as it can independently correct the most common errors (Fig. 16).
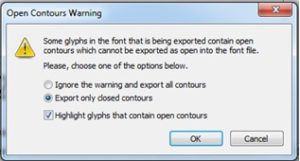
Fig. 16. FontAudit System Notification FontLab
It is also recommended to preview the font (Fig. 17) by executing the Tools→Quick test command.
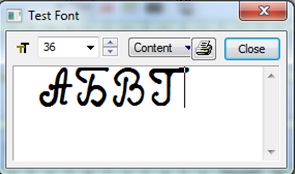
Fig. 17. Font Test Dialog
The font is ready for the final stage of font generation.
Font generation
By default, the FontLab system saves fonts in its own format with the vfb extension. It allows storing in one file all the information about the font needed, to export it to different formats.
To receive a ready-made font in one of the formats, select the Generate Font command from the File menu, specify the name of the font file, and select its format.
After creating, saving, and exporting the font to the desired format, it is necessary to upload the received font to the appropriate system folder (font registration), which actually makes the generated font available for use. In the Windows operating system, this is the Font folder.
Conclusions
The work presents the technology of creating handwritten fonts using FontLab Studio. The created font will be unique and individual, because each person has a different handwriting with certain graphic features. Fonts created in such a way, make it possible to personalize communication processes.
References
- Vildavski V.Y., Verde L.L., Blumberg G., Parsey J., Norcia A.M. PseudoSloan: A perimetric-complexity and area-controlled font for vision and reading research (2022) Journal of Vision, 22 (10), art. no. 7. DOI: 10.1167/jov.22.10.7.
- Wallace S., Bylinskii Z., Dobres J., Kerr B., Berlow S., Treitman R., Kumawat N., Arpin K., Miller D.B., Huang J., Sawyer B.D. Towards Individuated Reading Experiences: Different Fonts Increase Reading Speed for Different Individuals (2022) ACM Transactions on Computer-Human Interaction, 29 (4), art. no. 38. DOI: 10.1145/3502222.
- Minakata K., Beier S. The dispute about sans serif versus serif fonts: An interaction between the variables of serif and stroke contrast (2022) Acta Psychologica, 228, art. no. 103623. DOI: 10.1016/j.actpsy.2022.103623.
- Majeed S., Hassan A.U., Choi J. Few-Shot Content-Level Font Generation (2022) KSII Transactions on Internet and Information Systems, 16 (4), pp. 1166 – 1186. DOI: 10.3837/tiis.2022.04.005.
- Hou G., Anicetus U., He J. How to design font size for older adults: A systematic literature review with a mobile device (2022) Frontiers in Psychology, 13, art. no. 931646. DOI: 10.3389/fpsyg.2022.931646.
- Kuroki H., Baba T. Calligraphy Z: A Fabricatable Pen Plotter for Handwritten Strokes with Z-Axis Pen Pressure (2022) UIST 2022 Adjunct – Adjunct Proceedings of the 35th Annual ACM Symposium on User Interface Software and Technology, art. no. 78. DOI: 10.1145/3526114.3558657.
- Berio D., Leymarie F.F., Asente P., Echevarria J. StrokeStyles: Stroke-based Segmentation and Stylization of Fonts (2022) ACM Transactions on Graphics, 41 (3), art. no. 26. DOI: 10.1145/3505246.